

Introduction
A trophy is the one load a hunter will not compromise on. The cape can be ruined in thirty minutes of careless handling. A cracked antler base or a tine snapped off against a tree trunk is a permanent loss that no taxidermist can repair. And the whole prize has to come off the mountain on the same back that is already carrying boned-out meat, camp gear, and three days of supplies. Most pack manufacturers treat this as a logistics footnote. The experienced trophy hunter treats it as the entire point of the pack.
Trophy carriage - the trophy carriage system - is the most underrated function on a frame pack. The frame gives you a rigid structure that can absorb a load no soft-sided daypack can touch, but that structure only pays off if the attachment points, straps, and protection geometry are engineered for the trophy itself. An elk antler pack that swings, a cape that slides down the frame, a skull mount that torques the stays sideways - these are design failures that show up on the worst possible day. This article breaks down the trophy load, the engineering of antler attachment, cape preservation, frame integration, field dressing compatibility, and what the factory floor needs to build it properly.
Technical Part 1: The Trophy Load Problem
Antler Mass and Geometry
The numbers matter more than most buyers realize. A mature whitetail or mule deer rack attached to the skull - the cape included - weighs 3–5 kg. An elk rack in full velvet is a different class of load: 10–15 kg of bone, and it is not symmetrical. The antlers grow off a single centerline, so the mass distribution is never even. One main beam is typically longer and heavier than the other, and a bull that raked one side harder while feeding can carry visibly more mass on the left than the right. That asymmetry is the first thing a frame has to handle.
The second problem is the shape. A spread of antlers is a lever, not a brick. A 40-inch elk spread carried flat against the back extends the load column well past the shoulder width, and every step transfers torque through the attachment points. The center of mass sits high - roughly at the level of the hunter's neck and head - so the load wants to tip the pack backward the moment the hunter leans forward. There is no way to pack an elk rack low; the geometry forbids it. What a good pack can do is control where the lever attaches, how it is braced, and what happens to the forces that would otherwise hit the frame structure.
The Cape: A Perishable Textile Problem
The cape is the part that goes bad fastest. A fresh cape, skinned off a killed animal, is a warm, damp, protein-rich slab of hide that begins deteriorating the moment the body heat is trapped. Two rules govern cape handling: it has to cool, and it must not be creased. A cape folded over once and lashed flat against a packbag holds body heat at the fold lines, and within hours the hair slips - the hide starts to shed hair in patches and the taxidermist's job becomes a salvage operation. Folds also leave permanent crease lines that never press out of the finished mount.
So the cape is not a textile you can stuff. It needs to be rolled loosely - hair side in or hair side out depending on the handler's system - into a compact cylinder that breathes, and it needs to ride where nothing presses a crease into it. That puts the cape in direct competition with the meat load for the same external space.
Lateral Loads on the Frame
The frame is designed for vertical compression - loads stacked on the hip belt and spine. An antler load attacks it from the side. Hooking a rack over a strap point or a frame stay puts a lateral force vector into the structure that the frame was never loaded for in static testing. On uneven terrain, the antlers sway; each sway is a dynamic lateral shock that works the rivets, the webbing attachments, and the stitching of the mounting point. This is why a trophy carriage system cannot be an afterthought strap sewn onto the packbag. It has to be a defined load path: frame stay, reinforced webbing panel, load-rated buckle, and a protector that damps the sway before it reaches the structure.
Space Competition with the Meat Load
The honest conflict: the meat load and the trophy want the same real estate. The meat shelf on a frame pack - the load platform below the main bag - is where boned-out quarters and the cape bag naturally sit. The antlers want to mount high, clear of the shelf, or they interfere with every grab at the shelf straps. The cape wants to ride on top of the meat where it can breathe, or in a dedicated slot that does not compress it. A pack that cannot carry a full elk load - meat in the shelf, antlers on the frame, cape in the top compartment - forces a decision the hunter should never have to make in the field. The system has to handle all three simultaneously.
Technical Part 2: Antler Attachment Engineering
The Head/Neck Attachment Point
The single most important detail is where the skull attaches. The skull has no convenient lash loops; it is a smooth, rounded bone with antlers sticking out of it. The working solution used across serious elk antler packs is a head/neck sling: a wide webbing cradle that passes behind the skull base and cinches over the neck bone, holding the head against the frame like a helmet on a rack. The cradle has to be wide - 38–50 mm webbing minimum - because a narrow strap on a rounded skull becomes a pivot, and the head rotates under load. A two-point or three-point cinch (skull base, both antler bases) locks rotation down to near zero.
Antler Protectors and Cushioning
Bare antler against bare frame is a wear test for both. The antler base is sharp-edged and dense; tines are pointed and will punch through a thin packbag wall in a single fall. And the frame's aluminum stays will gouge the antler's outer surface, which destroys the surface finish a taxidermist needs. The protector is a padded sleeve or cup that wraps the antler bases - closed-cell EVA or molded foam, 8–12 mm thick, covered in abrasion-resistant fabric - that the rack sits into. The protector does three jobs: it spreads the load so the antler does not dig into webbing, it damps the sway that would otherwise hammer the frame, and it protects the finish of the bone. For a cape-on skull mount, the protector must also bridge the cape fold so no hard edge presses a crease into the hide.
Mounting Orientation: Up, Back, or Side
Three orientations dominate, and each trades balance against protection.
Antlers up. The rack rides vertical, tines pointing skyward beside the head. This is the classic elk antler pack layout: it keeps the spread narrow, so the pack clears brush and the hunter can shoot prone without the tines fouling the rifle. The cost is height. The load column rises above the shoulders, pulling the center of gravity back and up; on a descent the rack catches overhanging branches, and a snagged tine under tension levers the whole pack.
Antlers back. The rack lies flat along the frame, beams pointing rearward. Lowest center of gravity of the three, best for trail balance, and the flattest profile for brush. The cost: the spread now extends backward where it bangs into rock slabs on scrambles, and the flat position presses the rack against the packbag, which is where a bare cape gets creased unless the protector is designed for it.
Antlers side. The rack cantilevers off one side of the frame. Rarely a good idea. It puts the heaviest load on the pack's weakest axis, forces the hunter to counterbalance every step, and extends the silhouette into the brush. The only defensible use is a short carry to a horse or a vehicle.
Asymmetric Load Compensation
The rack is not symmetrical, and the pack has to be. The engineering answer is a compensation strap - a lateral tie that pulls from the heavier beam side back toward the centerline, so the visual tilt of the rack is corrected before it becomes a gait problem. The balance strap doubles as a brace: anchored to the opposite frame stay, it converts some of the lateral torque into vertical compression that the frame handles easily. The strap also gives the hunter a way to re-tension after an hour of walking, when the cradle has settled. A system with no compensation strap is a system that fights the hunter for the whole trip out.
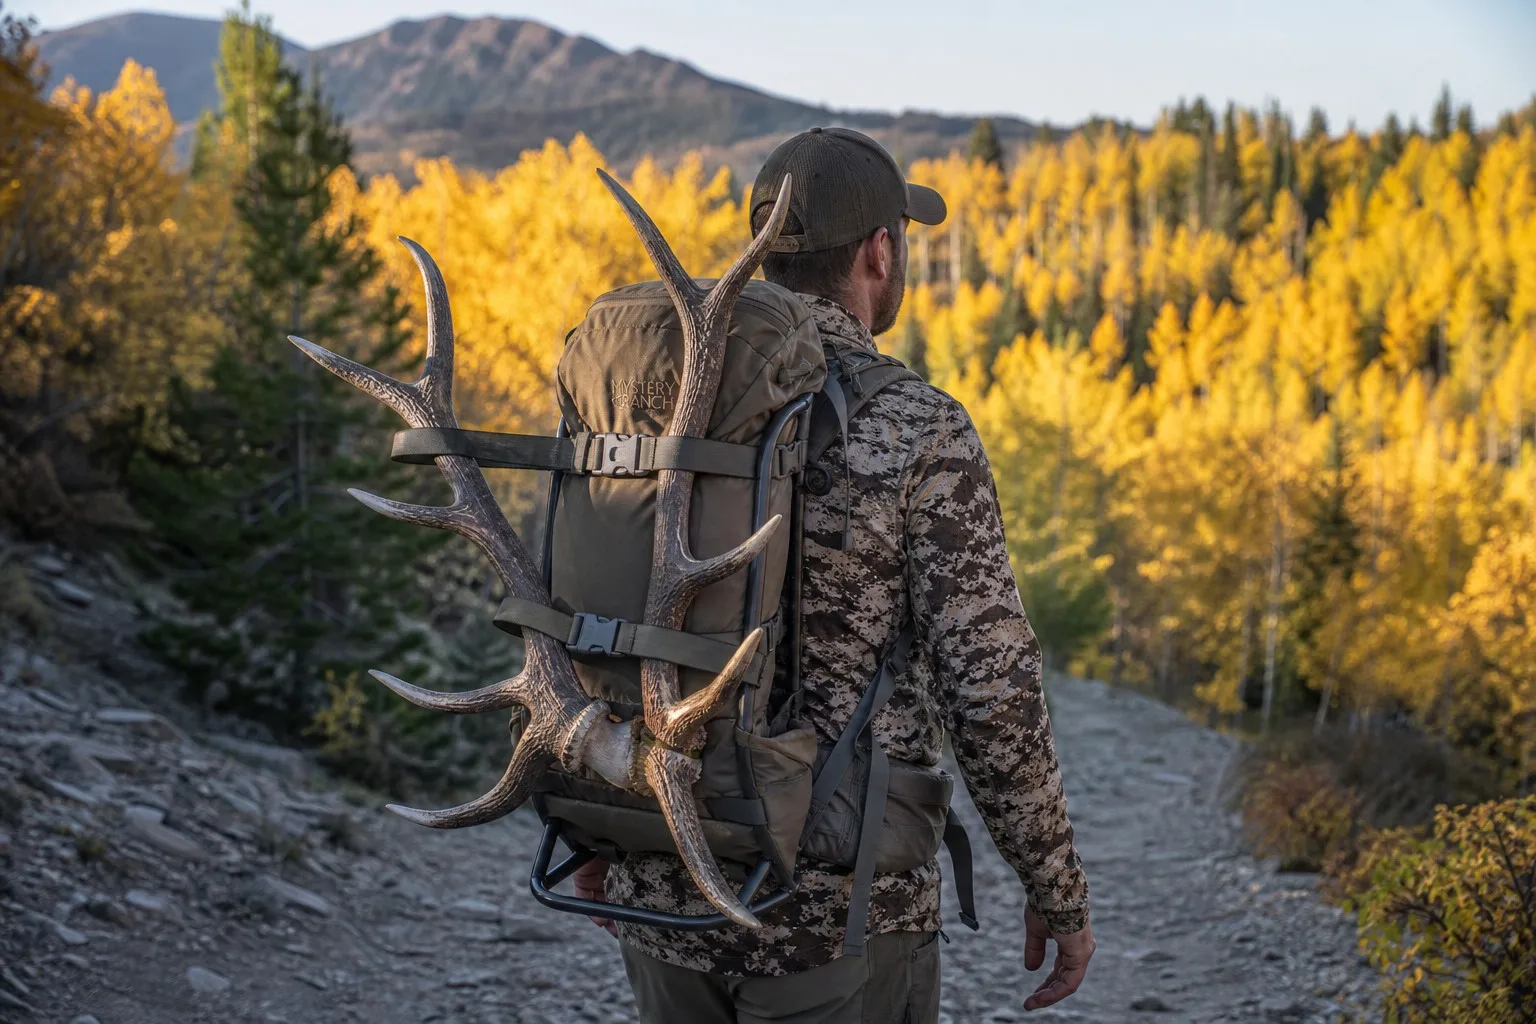
Rack on the frame, balance strap pulling the load back to centerline
Technical Part 3: Cape Preservation
Roll, Never Fold
The cardinal rule is roll, never fold. A rolled cape - wrapped around the antler bases or into a loose cylinder with the hair side inward - has no crease lines, and the open ends let body heat escape. Folding is how hair slip starts. The roll does not need to be tight; a tight roll traps heat at the core just like a fold does. Loose roll, breathable wrap, done.
The Breathable Game Bag
Cape transport demands a breathable game bag: open-weave cotton or a mesh-backed hide bag, never a sealed plastic sack. The bag's job is to keep hair, blood, and debris off the pack while letting air move. A plastic bag traps the moisture that drives slip; a sealed bag over a warm cape is a guaranteed ruined mount within hours. For an elk antler pack the cape bag usually rides on top of the meat load or in the top lid compartment, where it gets airflow and stays out from under the rack.
The Anti-Slip Layer
A fresh cape is slick - the hair side slides against everything, and the flesh side is damp. On a frame pack, an unsecured cape bag slides down the packbag, works its way under the load, and comes out creased anyway. The anti-slip layer is a rubberized or silicone-dot patch on the packbag surface where the cape bag sits - or, better, a webbing lash grid with a coarse base that the bag bites into. The cape must be held by friction and straps, not by hope.
Hair vs. Meat Isolation
One detail most designs miss: hair and meat do not mix. The cape sheds hair as it dries, and loose hair on a meat bag is a contamination issue for the butcher and a quality complaint for the customer. The cape should ride in its own bag, physically separated from the meat bags, with its own strap set. If the cape bag is lashed on top of the meat shelf, it needs a non-wicking barrier layer - a coated fabric or a dedicated shelf top - so blood from the meat does not soak up into the cape. Two loads, two zones, two sets of straps.
Frame Integration
Lash Point Position Engineering
The lash points are not decoration; their position determines whether the pack works in the field. The rule is simple: every external attachment point must be reachable and must not block the main compartment. A daisy chain stitched behind the top lid is useless because the hunter has to unload the lid to use it. The working layout puts antler lash points on the frame stays and the upper packbag corners, cape points on the top and sides of the bag, and meat points on the shelf - each zone reachable without opening the other. Position engineering is also geometry: the antler point has to sit above the point where a loaded cape bag sits, or the rack presses the cape flat against the bag.
Trophy Compartment vs. External Lashing
Two schools exist. The internal trophy compartment - a padded, dedicated section of the packbag for the cape, sometimes with a skull pocket - protects the cape completely and keeps the silhouette clean. Its cost is volume and access: a trophy compartment eats 15–25 L that could hold camp gear, and it is a fixed allocation that is dead weight on hunts where the hunter comes out empty. External lashing keeps the volume flexible but exposes the cape to branches, weather, and compression. The strongest designs do both: an external lash system for the antlers, a stowable internal cape sleeve that can be unzipped flat when not needed.
The Detachable Trophy Bag
The production answer to the compartment-versus-lashing argument is the detachable trophy bag: a dedicated, padded, breathable bag that clips onto the frame's lash points and unclips to hang from a game pole or to be lowered off a cliff edge. The detachable bag solves access, cleaning, and transport in one move. The cape goes in the bag at the kill site, the bag clips to the frame, and at the truck the bag unclips without the cape ever touching the pack again. The cape never sees the inside of the main compartment, which means the pack's interior stays clean and the cape stays protected.
The Balance Strap
Every trophy load needs a balance strap - the lateral tie described in Technical Part 2, plus a vertical stabilizer that connects the top of the rack to the frame above the load lifters. The vertical stabilizer is what kills the sway on descents. A rack tied only at the bottom is a pendulum; tied top and bottom, it becomes part of the load column. Two straps, top and bottom, is the minimum for any load over 5 kg.
Field Dressing Compatibility
The Boning/Quartering Flow
The trophy carriage system has to survive the transition from field dressing to pack-out without a repack. The flow on a good hunt: kill, cape and skull the head, bone out the quarters, bag the meat, load the cape, mount the rack, move. Every step of that flow should happen with the pack open and the frame accessible - which means the lash points and straps have to be reachable from the side of the pack, not buried under the top lid. The rack mounts first or last depending on the hunter's preference, but the straps have to clear the meat shelf so the shelf can be loaded and unloaded without unlashing the antlers.
Trophy-First vs. Meat-First Logic
The decision logic is simple and worth putting in the manual. If the animal is a trophy-class animal - a record-book bull or a once-in-a-lifetime buck - the trophy is the primary load and the meat rides second; the pack is arranged so the rack mounts first and the meat shelf loads around it. If the animal is meat-class - a cow elk or a young buck - the meat is the primary load and the rack mounts last, or the head is boned and the antlers lashed flat. The pack design should support either order without modification, because the hunter decides in the field, in the dark, in the rain.
Securing for Horse and ATV Transport
The last problem is the long haul. On a horse or an ATV, the pack rides where the hunter cannot re-tension straps, and the trophy load takes hours of vibration and hard jolts. The securing rule: the rack must be tied to the frame structure itself, never to the packbag alone, and the straps must be load-rated with metal or reinforced buckles - a plastic side-release buckle under hours of vibration can work loose or crack in cold weather. The detachable trophy bag earns its keep here too: it can be lashed to the saddle or the rack with its own straps, independent of the pack, which is how the trophy survives a rough ride that would otherwise beat it against the frame all day.
Factory Profile: Guangzhou GAF Outdoor
GAF Outdoor (Guangzhou, in operation since 2011) builds the sub-assemblies that make a trophy carriage system shippable. The floor runs multi-layer reinforcement sewing: webbing panels stitched through packbag layers into the frame sleeve, load-rated attachment points with bartack reinforcement, and double-needle seams on every strap that carries structural load. The cut-and-sew line handles padded trophy bags in breathable fabrics - open-weave mesh, cotton duck, and coated laminates for the barrier layer - plus closed-cell EVA protector pads and rubberized anti-slip patches as standard operations. Hardware sourcing covers 38–50 mm wide cradle webbing, metal buckles for vibration environments, and quick-release side-release buckles for the field.
The practical point for a B2B buyer: trophy carriage is a sewing-and-hardware problem, and it has to be engineered into the pack from the first sample, not added after the bag is tooled. The lash points have to align with the frame geometry; the protector has to be fitted to the rack the pack will actually carry; the strap routing has to clear the meat shelf. That is design work, and it happens on the factory floor with the pattern makers and the sewing leads.
Buyers should verify current capacity, MOQ, and hardware certification with the factory directly before committing to a production schedule.
B2B Strategy: Trophy Carriage as the Premium Selling Point
The North American trophy hunter market runs on two questions: will the pack protect the trophy, and will it carry the load. Purchase decisions are made on credibility - field reports, build photos, spec sheets, and load-test videos - before they are made on price. A trophy carriage system is the highest-visibility premium feature a frame pack can carry, because it is the feature the customer cannot test in a store and has to trust. That trust is exactly what a spec-sheet pack sells: rated lash points, protector material thickness, strap widths, buckle load ratings.
The strategy is bundling. The antler carry hunting backpack sells the frame; the trophy carriage system sells the upgrade. A brand that ships a frame pack with a detachable trophy bag, a protector set, and a documented load spec at a $150–250 premium captures the trophy hunter on the first purchase, and the accessory reorder path - replacement protectors, spare straps, a second cape bag - creates the repeat revenue. Distributors should demand the spec sheet and the load-test data from the factory before quoting the line, because that documentation is the marketing material the retailer needs to close the sale.
The takeaway for buyers: trophy carriage is not a detail, it is the differentiator. Ask the factory about lash point reinforcement, protector construction, cradle webbing width, and cape bag breathability the same way you ask about frame material and denier. The brands that treat the trophy load as an engineering problem - and can prove it on paper - are the ones that own the trophy hunter's next purchase. When the antlers are on the pack and the mountain is still between you and the truck, the system is the only thing between a lifetime trophy and a pile of broken bone.


